Need to scan an important document but don’t have a scanner? Your Android phone can do it in seconds using the Google Drive app. Whether it’s an Aadhaar card, PAN card, invoice, receipt, contract, or handwritten notes, Google Drive lets you scan documents and save them as PDFs for free. If you’re searching for How to Scan Documents with Google Drive, this guide will walk you through the complete process.
In this article, you’ll learn how to scan documents with Google Drive, improve scan quality, organize files, and share them securely.
Important: For the best scan quality, place your document on a flat surface with good lighting and avoid shadows.
Table of Contents
- What Is Google Drive Document Scanning?
- Why Use Google Drive to Scan Documents?
- How to Scan Documents with Google Drive
- How to Improve Scan Quality
- How to Share or Download Scanned Documents
- Frequently Asked Questions
- Final Thoughts
What Is Google Drive Document Scanning?
Google Drive includes a built-in document scanner that uses your phone’s camera to capture papers and automatically convert them into PDF files.
You can scan:
- Aadhaar Card
- PAN Card
- Passport
- Driving Licence
- Bills
- Receipts
- Office documents
- Certificates
- School notes
- Contracts
The scanned document is stored directly in your Google Drive account.
Why Use Google Drive to Scan Documents?
Google Drive offers several benefits:
- Completely free
- No extra scanner app required
- Automatically saves documents as PDF
- Easy cloud backup
- Quick sharing via link or email
- Good image enhancement
- Secure Google cloud storage
It’s one of the easiest ways to digitize paper documents.
How to Scan Documents with Google Drive
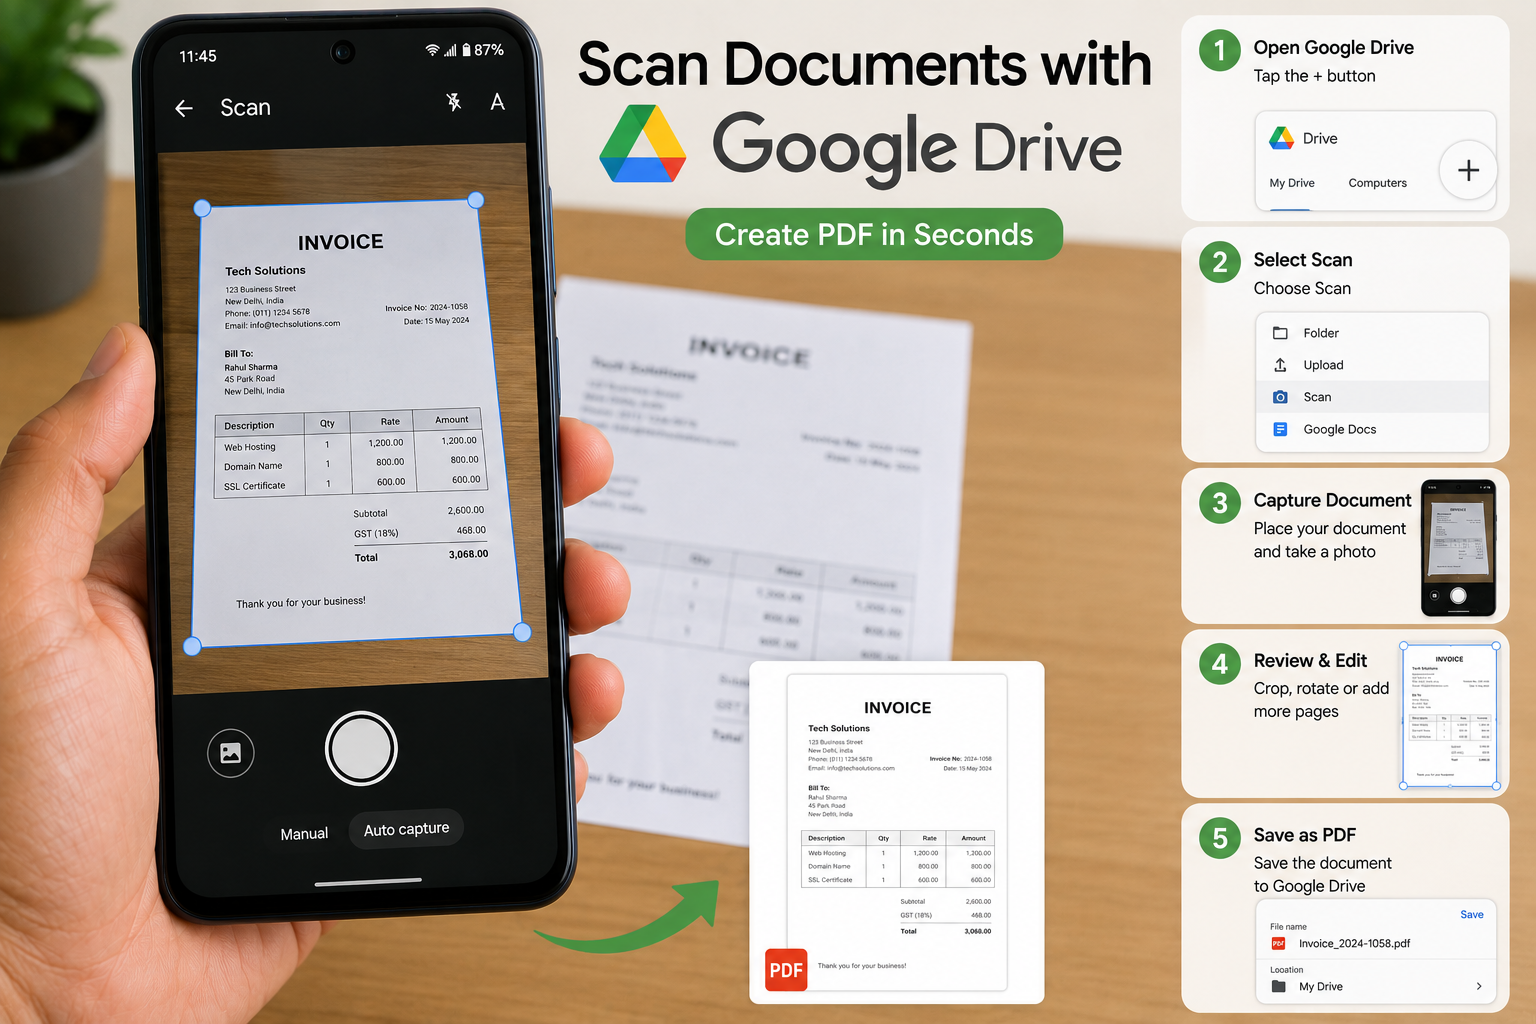
Step 1: Install or Open Google Drive
If you don’t already have it, install the latest version of the Google Drive app from the Google Play Store.
Then open the app and sign in to your Google Account.
Step 2: Tap the Plus (+) Button
On the home screen, tap the + (New) button.
A menu with several options will appear.
Step 3: Select “Scan”
Tap Scan.
Google Drive will open your phone’s camera.
On some newer Android devices, the scanning option may appear as Scan or may use Google’s document scanning interface depending on the app version.
Step 4: Capture the Document
Place your document on a clean, flat surface.
Make sure:
- Good lighting is available.
- The entire document fits inside the frame.
- Your hands don’t cover the page.
- The camera remains steady.
Tap the capture button.
Step 5: Review and Edit the Scan
After scanning, Google Drive allows you to:
- Crop the document
- Rotate pages
- Retake the photo
- Apply image enhancement
- Add additional pages to create a multi-page PDF
Review the document carefully before saving.
Step 6: Save as PDF
Tap Save.
Choose:
- File name
- Google Drive folder
- Google Account (if multiple accounts are signed in)
The document will automatically be saved as a PDF.
Step 7: Share or Download the PDF
Once saved, you can:
- Share via Gmail
- Send on WhatsApp
- Copy a Google Drive link
- Download the PDF
- Print the document
Google Drive makes collaboration easy by allowing secure sharing with others.
How to Improve Scan Quality
For professional-looking scans:
Use Good Lighting
Natural light or bright indoor lighting produces clearer scans.
Keep the Camera Steady
Avoid blurry images by holding your phone still while capturing the document.
Clean the Camera Lens
A dirty camera lens can reduce image quality.
Place Documents on a Plain Background
A contrasting background helps the scanner detect document edges more accurately.
Avoid Shadows
Ensure your hands or nearby objects don’t cast shadows over the paper.
Scan at Full Size
Capture the complete page without cutting off edges.
How to Organize Scanned Documents
To keep your files organized:
- Create folders for different document types.
- Use descriptive file names.
- Delete duplicate scans.
- Star important documents for quick access.
- Regularly review your Google Drive storage.
A well-organized Drive account makes it easier to find documents later.
Common Mistakes to Avoid
Avoid these scanning mistakes:
- Scanning in poor lighting.
- Cropping important information.
- Saving files with unclear names.
- Forgetting to review the PDF before sharing.
- Leaving sensitive documents publicly accessible through shared links.
Read More:
- Kya Aapka Gmail Account Hack Ho Gaya Hai?
- Google Par Apni Photo Kaise Search Kare
- How to Check Login History on Instagram: 7 Easy Steps
- How to Remove Spam Calls Automatically on Android
Frequently Asked Questions
Is Google Drive document scanning free?
Yes. Google Drive’s built-in document scanning feature is free to use.
Can I scan multiple pages into one PDF?
Yes. Google Drive allows you to add multiple pages before saving the document as a single PDF.
Does Google Drive scan in color?
Yes. Depending on your device and app version, Google Drive can preserve color or enhance document readability automatically.
Can I edit the scanned PDF?
You can crop, rotate, and enhance the scan before saving. More advanced PDF editing may require a dedicated PDF editor.
Final Thoughts
Learning How to Scan Documents with Google Drive is a simple way to turn your Android phone into a portable document scanner. Whether you’re scanning personal IDs, office paperwork, receipts, or study notes, Google Drive helps you create clear PDF files quickly and securely.
By using proper lighting, reviewing each scan, and organizing your files in Google Drive, you can manage important documents more efficiently without needing a physical scanner.