If you want to improve your Android privacy and security, turning on Private DNS is one of the simplest settings you can use. It does not require a separate app, and on supported Android versions, the feature is already built into the phone.
In this guide, you’ll learn how to turn on Private DNS on Android, how the setting works, which option you should choose, and what to do if your internet stops working after changing the DNS setting.
What Is Private DNS on Android?
DNS stands for Domain Name System. It helps your phone find the correct server when you enter a website address such as google.com.
Normally, DNS requests can be handled by your network or internet provider. Android’s Private DNS feature can protect these DNS queries by using encrypted DNS communication.
Google recommends keeping Private DNS turned on where possible, but it is important to understand its limitation: Private DNS protects DNS questions and answers, not all of your internet traffic.
So, Private DNS is useful for improving privacy, but it is not the same as a VPN.
Why Should You Use Private DNS?
There are several reasons to keep Private DNS enabled on your Android phone.
1. Better DNS Privacy
Private DNS can help protect your DNS requests from being easily observed on the network.
2. Works Across Networks
Android’s Private DNS setting can apply to networks that support it, including Wi-Fi and mobile connections.
3. No Extra App Required
You don’t necessarily need to install a third-party application just to enable Private DNS.
4. Useful on Public Wi-Fi
When using Wi-Fi in places such as cafés, airports, hotels, or libraries, additional protection for DNS queries can be useful.
5. Easy to Change
You can switch between Automatic, Off, and a specific Private DNS provider from Android Settings.
How to Turn On Private DNS on Android
The exact menu names can vary slightly depending on your phone manufacturer and Android version. However, the basic process is similar.
Step 1: Open Settings
Unlock your Android phone and open the Settings app.
You can usually find the Settings icon in your app drawer or Quick Settings panel.
Step 2: Open Network & Internet
Look for:
Settings → Network & internet
On some phones, this section may have a different name, such as:
- Connections
- More connection settings
- Network settings
- Wi-Fi & Internet
If you cannot find Private DNS, use the Settings search bar and type Private DNS.
Google also recommends searching for “Private DNS” if the option isn’t visible in the expected location.
Step 3: Tap Private DNS
Once you open the network settings, tap Private DNS.
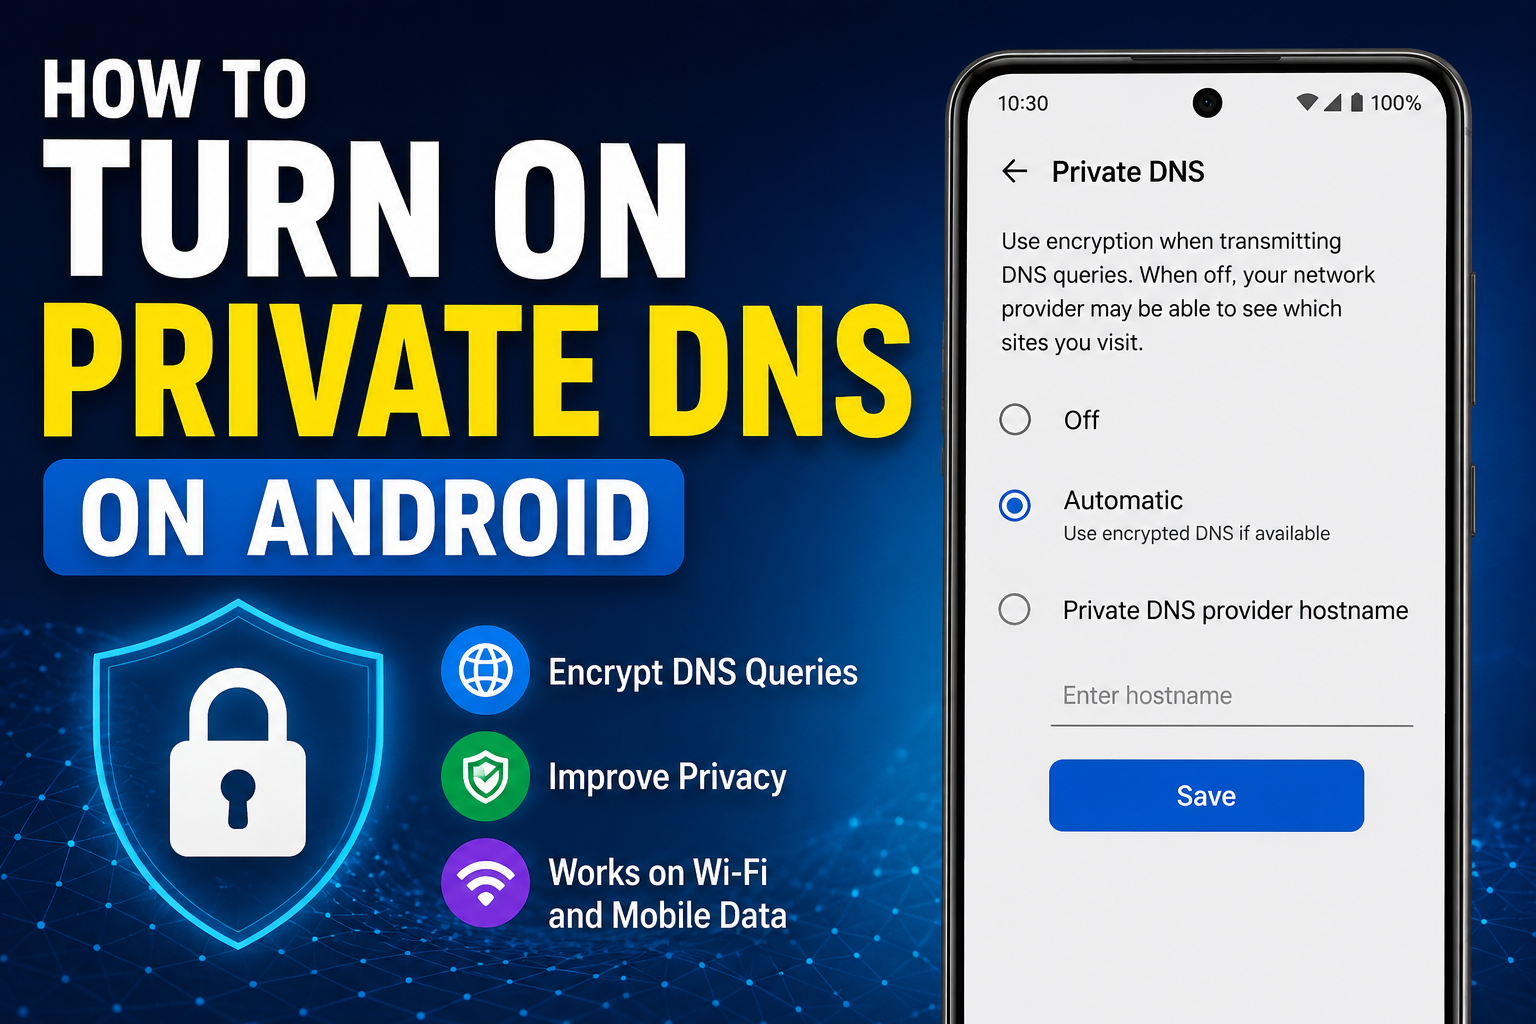
You should normally see options similar to:
- Off
- Automatic
- Private DNS provider hostname
These are the standard Android Private DNS choices documented by Google.
Step 4: Select Automatic
If you simply want Android to use Private DNS without manually entering a provider, select:
Automatic
This is the easiest option for most users.
You don’t need to enter a hostname manually.
Step 5: Tap Save
After selecting the option, tap Save if your phone displays a Save button.
Your Android phone will now use the selected Private DNS configuration.
That’s it.
How to Use a Custom Private DNS Provider
Android also allows you to enter a Private DNS provider hostname manually.
This can be useful if you specifically want to use a DNS service that provides its own hostname.
To configure it:
- Open Settings.
- Go to Network & internet.
- Tap Private DNS.
- Select Private DNS provider hostname.
- Enter the hostname provided by your chosen DNS provider.
- Tap Save.
Be careful when entering the hostname. A spelling mistake can prevent your phone from connecting properly to the internet.
Automatic vs Custom Private DNS
Which option should you choose?
| Option | Best For |
|---|---|
| Off | Troubleshooting or special network requirements |
| Automatic | Most Android users |
| Private DNS provider hostname | Users who specifically want a particular DNS provider |
For most people, Automatic is the simplest choice.
If you have a specific reason to use another DNS provider, you can select the hostname option instead.
What Is the Difference Between Private DNS and a VPN?
This is one of the most important things to understand.
Private DNS is not a VPN.
Private DNS focuses on protecting DNS queries and responses. It does not encrypt all the other internet traffic generated by your phone.
A VPN works differently by creating an encrypted connection between your device and a VPN server.
Therefore, turning on Private DNS does not mean that your entire internet connection has become anonymous or completely encrypted.
Google specifically notes that Private DNS only secures DNS questions and answers.
What If Websites Stop Opening After Enabling Private DNS?
Sometimes a custom DNS provider may have connectivity problems.
If websites stop loading after you configure a custom hostname, try these steps.
Switch Back to Automatic
Go to:
Settings → Network & internet → Private DNS → Automatic
Then tap Save.
Try opening a website again.
If the internet starts working normally, the custom DNS configuration may have been the problem.
Check the Hostname
If you’re using a custom provider, carefully check the hostname.
Make sure:
- There are no spaces.
- The spelling is correct.
- You entered the provider’s hostname rather than an IP address if the provider specifically requires a hostname.
Restart Your Connection
If the problem continues, turn Wi-Fi or mobile data off and then turn it back on.
You can also restart your phone.
Private DNS May Look Different on Samsung and Other Phones
Not every Android phone uses exactly the same Settings layout.
For example, your phone may place Private DNS under a menu such as:
Settings → Connections → More connection settings → Private DNS
Another phone may show:
Settings → Network & internet → Private DNS
If you don’t see the option, simply search Private DNS inside the Settings app.
Android’s own documentation notes that menu locations can vary and recommends using Settings search or checking with the device manufacturer when the option isn’t found.
Does Private DNS Block Ads?
Private DNS itself is not automatically an ad blocker.
However, some third-party DNS providers offer filtering features that can block requests to certain advertising, tracking, or malicious domains.
Whether something gets blocked depends on the DNS provider and its filtering rules.
So don’t assume that simply switching Android to Automatic Private DNS will remove advertisements from every app or website.
Can Private DNS Make the Internet Faster?
Not necessarily.
Changing DNS providers can sometimes affect how quickly domain names are resolved, but your overall internet speed depends on many other factors, including:
- Your Wi-Fi connection
- Mobile network quality
- Distance from servers
- Network congestion
- Your internet provider
- The website or service you’re accessing
Private DNS should therefore be considered primarily as a privacy and DNS-management feature, rather than a guaranteed internet-speed booster.
When Should You Turn Private DNS Off?
Most users can leave Private DNS enabled.
However, temporarily changing it may help troubleshoot certain connectivity problems.
For example, if your phone cannot connect to websites after entering a custom DNS hostname, switch back to Automatic.
Some managed or work devices may also restrict network settings. In those situations, the available options can depend on the device’s management configuration.
How to Check Whether Private DNS Is Working
There isn’t always a simple Android screen that says “Private DNS is working.”
The easiest approach is to:
- Enable Automatic or your chosen provider.
- Connect to Wi-Fi or mobile data.
- Open Chrome or another browser.
- Visit a few trusted websites.
- Check whether your connection works normally.
If everything loads normally, your configuration is likely working as expected.
For more advanced verification, you can use a reputable DNS-testing service, but ordinary users generally don’t need to perform additional tests.
Common Private DNS Mistakes to Avoid
Don’t Enter Random Hostnames
Only enter a hostname provided by a DNS service you trust.
Don’t Expect Complete Online Anonymity
Private DNS does not make you completely anonymous.
Don’t Confuse DNS With VPN
They serve different purposes.
Don’t Change DNS Just for Speed
A different DNS provider isn’t guaranteed to make your internet faster.
Don’t Panic If a Custom DNS Stops Your Internet
Simply switch back to Automatic and test the connection again.
Frequently Asked Questions
Is Private DNS safe on Android?
Yes. Android includes Private DNS as a built-in network feature, and Google recommends keeping Private DNS enabled where possible.
Does Private DNS protect all internet traffic?
No. It protects DNS questions and answers, but it does not protect every type of internet traffic.
Should I use Automatic Private DNS?
For most users, Automatic is the easiest option because you don’t need to manually enter a provider hostname.
Does Private DNS replace a VPN?
No. Private DNS and VPNs provide different types of protection.
Can I turn Private DNS off?
Yes. Open the Private DNS settings and select Off. However, Android recommends keeping Private DNS turned on where possible.
Why can’t I find Private DNS?
The location can vary by Android version and manufacturer. Search for Private DNS directly inside the Settings app.
Final Thoughts
Knowing how to turn on Private DNS on Android can help you make better use of your phone’s built-in privacy features.
For most people, the easiest approach is to open Settings → Network & internet → Private DNS and select Automatic. If you need a specific DNS service, you can instead enter its official Private DNS hostname.
Remember that Private DNS is helpful, but it isn’t a replacement for a VPN or complete online security. Use it as one part of a broader privacy and security setup.